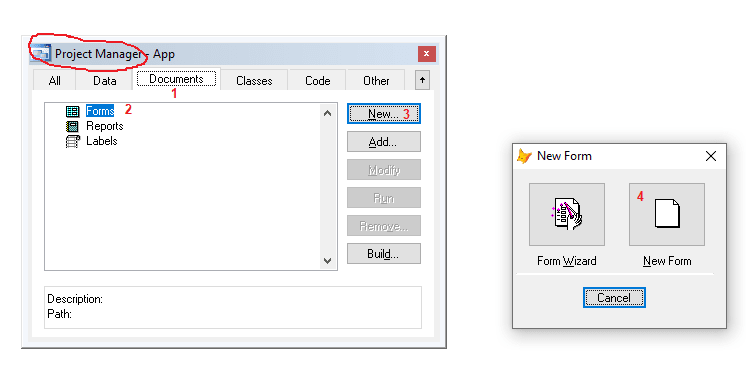
Dronner, if you seriously want to do something from scratch, then here are instructions on getting a form done that displays a list of data (a DBF) and a picture besides that list:
1. create a new project
2. create a dbf with the data to display
3. create a new empty form as I described it, not using aform wizard
I'm not detailed about these steps as you already were at that stage, at least at step 2 and I described how to create a form without the wizard.
4. While in the form designer, the first step is to give it hands on the data: Right click the form and pick "Data environment". You're asked to pick a DBF from an "open" (open file) dialog, so pick the one DBF you created in step2.
5. The data environment will show the picked dbf as a window with the file name as title and the fields you created in step 2. Also a dialog captioned "Add table or view" is still open and you can close that, as you don't want to add a second table.
6. Drag the window visualizing the DBF table to the empty form and a grid is created there, that's already configured in all details to show the list of data you have
7. Enlarge the form by dragging the lower right form corner witht he mouse. When you hover close to the corner the mouse pointer will change to a diagonal double arrow pointing out you can resize. Similarly you can resize the grid at the edges, corners and at the black square dots in the middle of edges with the mouse. Arrange it so you have empty space for the image control to display the photos you stored into your dbf.
8. If you don't have the form controls toolbar visible in the upper section directly under the menu you can activate it by going into the menu "View"->"Form controls toolbar"
9. pick the image control...
that one
10. Click on the form where the image control should show. Resize and move it where you want it.
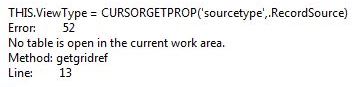
11. Right Click on the grid and pick "Code" from the context menu
12. The editor will likely show the first method (labeled "Procedure") of the grid "Activate Cell", you don't want to write code there, above the white editing area pick the dropdown button and pick the "AfterRowColChange" item. The code editor will now show a line LPARAMETERS nColIndex, you don't need that parameter, but you have to keep this line anyway, or the form will later error when that event happens. Edit it sthis way:
Code:
LPARAMETERS nColIndex
Thisform.UpdateImage()
13. Save with CTRL+S and close the editor window, you'll still be in the form designer that was behind it.
14. Go to menu "Form"->"New Method" and program the UpdateImage Method by first entering the name "UpdateIkmage" and the Add button. You could also write a description, but that name is pretty descriptive alrady. Click Close.
15. To get to that new method go back into the code editor by right clicking the form and picking Code again, like you did for the grid code.
16. In the section above the white code area, be sure you pick the Object "Form" and Procedure "updateimage", it'll be listed last, after all other methods, as userdefined method.
17. In that method write this code line
Code:
thisform.image1.Picture = Alltrim(car_photo)
18. pick "Init" from the procedure list and there also write the one line as in grid.AfterRowColChange:
Without any parameters this time.
19. Save again with CTRL+S and then you can run the form.
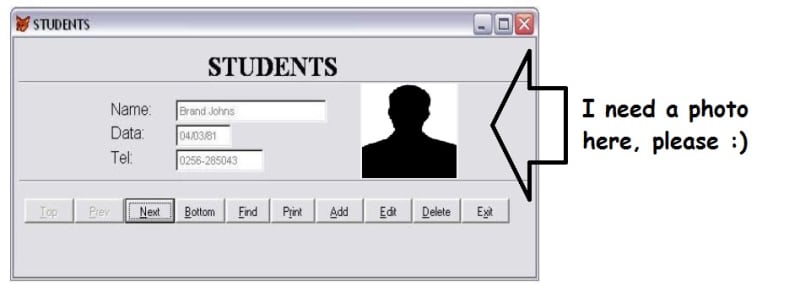
The form starts whoing the first car. Click on a record and the image of that record will show.
You can tidy up a lot of things now, for example, not showing the record id or the image file name in the grid and many more things.
But in short (or long), you have a runnable form displaying an image from a list. You don't need a navigation bar, you can simply scroll and pick out a record, you don't need a search box to enter an id to go to, but you could easily let the list be sortable with clicks on the header, add filters, etc., but all thise things are next steps.
Chriss
![[pc]](/data/assets/smilies/pc.gif "[pc] [pc]")