Tek-Tips is the largest IT community on the Internet today!

Members share and learn making Tek-Tips Forums the best source of peer-reviewed technical information on the Internet!

  • Congratulations gkittelson on being selected by the Tek-Tips community for having the most helpful posts in the forums last week. Way to Go!

User defined Num Pad on screen 1

Status
Not open for further replies.

Rajesh Karunakaran

Programmer
Sep 29, 2016
549
MU
Dear friends,

This is actually similar to one of my own threads on establishing a Numeric Key Pad on screen. It was successfully established.
But this time, the need is a bit different, or rather, a different approach. Now, I want to try using the general Vfp native command button right on a form itself.

I have a form, with many Textboxes and a Grid. Some of the textboxes contain code in its REFRESH, VALID, LOSTFOCUS methods.
As we all already know, the intention is, if I click on a control, ie any of the input textboxes, and the start clicking the num pad keys, I should get the textboxes update in realtime and finally when I click the 'Enter' key of numpad, the value should be submitted and the VALID clause of textbox, if any, will be triggered.

Has anyone already established things like this? Can you share some ideas?

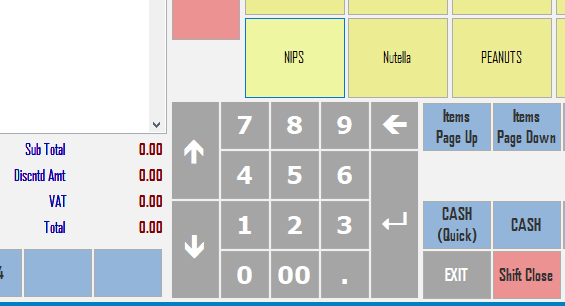
A typical screen is attached (it's a point of sale screen)

[URL unfurl="true"]https://res.cloudinary.com/engineering-com/image/upload/v1696941479/tips/New_Bitmap_Image_azfltj.bmp[/url]

(I know the Numpad in the image is not in standard full form. This is just for testing purpose)

Rajesh
 
By the way, how do I paste an image in between the texts, instead of upload and a link?

Rajesh
 
The problem is that buttons on a form move focus. So you trigger lostfocus/valid events of the textbox, which you want to avoid. You can't avoid the focus from moving, so you would need to program to allow it and disregard all values until finally the ENTER button is used.

So mainly you can't just put valid code into the textboxes that hinder the usage of the numpad buttons integrated into the same form. The valid code has to accept incomplete and even wrong input that's not yet fully entered, because you want to allow the numpad buttons to do their click event.

Defining the numpad as a toolbar resolves that problem and it makes no sense to want buttons on the form working the same way. You can always position and size the toolbar to where you would have the numpad buttons on the form and are done with that focus problem, because clicking a toolbar button does not move focus from the current tetbox and not even from the form itself.

Chriss
 
Just click the Image (camera icon), then pick an image and click done, this will write the necessary TGML img tag into the post and in preview you can see the image.

You seem to almost do that already, as your link is to the cloudinary service tek-tips uses. You just seem to remove the img tag surrounding that and only post the URL. Why?

Chriss
 
Chriss,

Yes, I can position the toolbar and make it stay at a fixed position. But, that toolbar has a border which is no way coorelates with our screen designs. I was not able to get rid of the toolbar borders. I remember Mike Lewes has provided a way for that but I had not tried it, I think.

I have been always wondering, if toolbar borders could have been controlled the way of containers, it would have been fantastic!

Let me try to put toolbar at an appropriate position.

Rajesh
 
Chriss said:
You just seem to remove the img tag surrounding that and only post the URL. Why?

I didn't remove anything.

I clicked on camera icon and it asked for uploading a pic with a Browse link. So, I had to first save my image onto a bmp file on desktop. Then I uploaded that file. Submitted the post.

Rajesh
 
You have multiple options, there is no need to move you image to the desktop.
With the browse button you get a file open dialog to pick any image file anywhere on your harddrive.
You can also drag an image to the area.

Anyway, then you see a preview - the image itself - and then, if you click "Done", it adds an img tag to your post. That looks like that:
[tt][ignore]
...
[/ignore][/tt]


Just leave it as that, click preview and you'll see the image embedded within the rest of your post text. Submit post and it also appears in the post.

Chriss
 
I remember Mike Lewes has provided a way for that but I had not tried it, I think.

I don't remember anything like that. Was it perhaps my suggestion of putting a container in the toolbar, and putting all the other toolbar controls in the container? In many cases, that solves various cosmetic issues with toolbars.

If that's not it, can you point me to the relevant thread?

Mike

__________________________________
Mike Lewis (Edinburgh, Scotland)

Visual FoxPro articles, tips and downloads
 
Just a thought on the solution for the grid/keypad entry...

First add a new property to the form, oInputControl and set its value to .NULL. initially. Then, in each of the controls that you want to receive the input from the keypad in the GotFocus event add the following:

Code:
thisform.oInputControl = this

Now in each of the Click() event methods for the keypad, put in the following:

Code:
IF !ISNULL(thisform.oInputControl)
    thisform.oInputControl.Value = thisform.oInputControl.Value + CAST(this.Caption AS I)
ENDIF

In the controls that you do not want to receive the input, add the following:

Code:
thisform.oInputControl = .NULL.

Not tested, but it should give you a starting point.


Greg
 
Greg said:
CAST(this.Caption AS I)
You don't mean that. It could simply be +This.Caption

Rajesh said:
Some of the textboxes contain code in its REFRESH, [highlight #FCE94F]VALID, LOSTFOCUS[/highlight] methods

That's where you get problems with numpad buttons. Clicking a button triggers the valid/lostfocus code of the currently focused textbox, though the focus will just need to be away to the button for a moment and should return to the textbox which should get the input from the button. But that'll be something you need to program. Automatically, the focus sticks to the button, once it's clicked.

And there the toolbar is not only an elegant solution, but it's also the only one without much fuss about when to run or not run validation, and lostfocus code, etc.

The outset is already bad: For form validation, a textbox valid is a bad point anyway, the user should be free to roam the form and only commit with a finalization step like the OK button is, or in case of a POS system the ENTER key.

So you programmed in a way that the valid event only is triggered by the ENTER key (of the toolbar keyboard or a real keyboard doesn't matter). But now every single key will cause this, not just ENTER. Because the keys are buttons on the form. And a button click moves the focus and thus triggers the whole event sequence including valid, lostfocus, and gotfocus of the button, too. Besides its When event. There seldom is code in the latter events, but the major consequence is that the valid event code now checks the textbox value too early and too often instead of once. And whatever processing is done in lostfocus also is too early. All that has to be rearranged and programmed differently.

And before you get all that right it's easier to fiddle with a toolbar you already have and get rid of the unwanted visual features in title and border. If docked, it won't have them anyway, but the "handle" to undock it will show and it'll rearrange and lose its aspect ratio. So docking is actually your enemy for that numpad toolbar, because you want the numpad to be somehwat square, and in its docked state, toolbar isn't square.

You better find how Mike Lewis suggested to get rid of the parts of the toolbar that you don't want to show, I think this will be using Windows API calls to remove the windows titlebar and border. Unlike a VFP form class a toolbar has no titlebar and borderstyle properties. But it's still a Windows OS window with a HWND, so you can manipulate it. It should be a few calls only, and that's far simpler than rearranging all other code.

Chriss
 
Code:
oToolbar = Createobject("yourtoolbar")
DECLARE INTEGER SetWindowLong IN user32;
	INTEGER hWnd,;
	INTEGER nIndex,;
	INTEGER dwNewLong
SetWindowLong(oToolbar.hwnd,-16,0)
oToolbar.Show()

This will get rid of the window border of a toolbar. In theory the 0 parameter should also get rid of the titlebar, but I think VFP already has created the toolbar window with titlebar and you can't undo that even before show() is called. VFPs' normal forms have a titlebar property you can set 0 also after the form already is shown, so it shouldn't be a problem to hide the titlebar in principle, even though a toolbar doesn't have that property. It should be doable with a toolbar window by some API calls, too. There are more things than -16 (that's GWL_STYLE), there's also GWL_EXSTYLE for extended windows styles. Also the basis of making a form transparent. I didn't dive deeper into it, though.

With SetWindowPos you can set the toolbar position and when it has no tiltebar the users also can't drag it away, not even accidentally.
See
Chriss
 
Rajesh,

The example you mentioned (to create a toolbar without a border or title bar) was not my code. It was posted by Craig Boyd. I simply provided a link to the relevant forum page.

I just tried running Craig's code. To be honest, I can't see what effect it has. The resulting toolbar looks exactly the same as a native toolbar, both docked and un-docked. I also tried adding Chris's code (where he calls SetWindowLong()). In that case, I can still see the bottom few rows of pixels in the title bar, but it might be possible to get rid of that by juggling the parameters to SetWindowLong() and perhaps the height of the toolbar.

Sorry I can't be much help here.

Mike

__________________________________
Mike Lewis (Edinburgh, Scotland)

Visual FoxPro articles, tips and downloads
 
Have you looked at this:


Regards

Griff
Keep [Smile]ing

There are 10 kinds of people in the world, those who understand binary and those who don't.

I'm trying to cut down on the use of shrieks (exclamation marks), I'm told they are !good for you.

There is no place like G28 X0 Y0 Z0
 
I see, Craig Boyd's idea is based on SetWindowRgn

His code needs adjustments to work correctly.

You have to know the Window region (0,0) coordinate is not VFPs (0,0) coordinate, the coordinaate system starts at the windows top left corner, so to only keep the inner region drawn, you need cordinates from
left = width of a sizable window frame - that's sysmetric(3)
top = border height of a sizable window frame + titltebar height - that's sysmetric(4)+sysmetric(9)
width and height are the titlebar width and height, but a region needs the right/bottom coordinates, so that's left+width and top+height.

When you change that in the Resize method it all works out.

It might also be easier to use GetWindowRgn to get the normal windows region (full toolbar with titlebar and borders) and then reduce the coordinates of that to the inner canvas without borders and toolbar.

By the way the coordinates don't change if you remove the border with SetWindowLong, so it's not worth combining both solutions. Once you get a grip on the Window coordinate system and region definition being left,top,right,bottom insted of left,top, width, height, you can get it going, using the metrics of different form elements by SYSMETRIC(). Intellisense tells you which numeric parmeter of SYSMETRIC() is for wht specific metric.

I played iwth a container on a toolbar, which I gave a red border, and then adjusted the region so that red border is exactly in the region. It's 1 pixel off of what I'd expect sysmetrics to fit perfectly. But +/- 1 pixel shouldn't matter, just don't design all your buttons to go exactly to the container border but leave a margin, and you'll be fine.

Chriss
 
I found this after a search in G. Just a stand alone bit of code from stack overflow:


Code:
*Begin code
        set safety off
        set default to addbs(justpath(sys(16,1)))

        public m.myvar1,m.myvar2,m.myvar3
        text to m.myvar1 noshow
        /9j/4QFFRXhpZgAASUkqAAgAAAAIABIBAwABAAAAAQAAABoBBQABAAAAbgAAABsBBQABAAAAdgAAACgBAwABAAAAAgAAADEBAgAdAAAAfgAAADIBAgAVAAAAmwAAABMCAwABAAAAAgAAAGmHBAABAAAAsAAAAAAAAAAsAQAAAQAAACwBAAABAAAAQWRvYmUgUGhvdG9zaG9wIENTIE1hY2ludG9zaAAyMDA1OjEyOjE1IDEyOjU5OjI1AAAHAACQBwAEAAAAMDIyMAGRBwAEAAAAAQIDAACgBwAEAAAAMDEwMAGgAwABAAAAAQAAAAKgBAABAAAARgAAAAOgBAABAAAARgAAAAWgBAABAAAACgEAAAAAAAACAAEAAgAFAAAAKAEAAAIABwAEAAAAAwAAAAAAAAABAQEBAAAAAAAAAAAAAAAAAAAAAAD/wAARCABGAEYDASIAAhEBAxEB/9sAhAAFAwMEAwMFBAQEBQUFBgcNCAcHBwcQCwwJDRMQFBMSEBISFRceGRUWHBYSEhojGhwfICEiIRQZJSckICceISEgAQUFBQcGBw8ICA8gFRIVFSAgICAgICAgICAgICAgICAgICAgICAgICAgICAgICAgICAgICAgICAgICAgICAgICD/xAGiAAABBQEBAQEBAQAAAAAAAAAAAQIDBAUGBwgJCgsQAAIBAwMCBAMFBQQEAAABfQECAwAEEQUSITFBBhNRYQcicRQygZGhCCNCscEVUtHwJDNicoIJChYXGBkaJSYnKCkqNDU2Nzg5OkNERUZHSElKU1RVVldYWVpjZGVmZ2hpanN0dXZ3eHl6g4SFhoeIiYqSk5SVlpeYmZqio6Slpqeoqaqys7S1tre4ubrCw8TFxsfIycrS09TV1tfY2drh4uPk5ebn6Onq8fLz9PX29/j5+gEAAwEBAQEBAQEBAQAAAAAAAAECAwQFBgcICQoLEQACAQIEBAMEBwUEBAABAncAAQIDEQQFITEGEkFRB2FxEyIygQgUQpGhscEJIzNS8BVictEKFiQ04SXxFxgZGiYnKCkqNTY3ODk6Q0RFRkdISUpTVFVWV1hZWmNkZWZnaGlqc3R1dnd4eXqCg4SFhoeIiYqSk5SVlpeYmZqio6Slpqeoqaqys7S1tre4ubrCw8TFxsfIycrS09TV1tfY2dri4+Tl5ufo6ery8/T19vf4+fr/2gAMAwEAAhEDEQA/APeLixh+KFs19fyNJauSbeAt8iL246Z9652T4LaSznbYxY/3K0fhFM7+F7JSf+WYFenQwLtHy1wwhGrFSlufc4zG18orSw9CVoJ2SPH/APhSemf8+EX/AHxR/wAKU0sf8uEX/fFezCBMfdFMeBccKKr6rDscn+s+N/mZ40fgxpK9bKEf8App+D+iL1tYB/wGvW7m3XB+UVjX1uozwKl4eC6HVRz/ABlTRzZ5w3wo0FOtvBx/siszW/hloUNlI8dtASq54Fd3fQgE8CsLU1xbTDHGw1jKnFaWPYw+PxUmm6jPNvBn7Qd78G9WutN1FrnVNFeP9xbtJlreQEfcJzhSM5XpnGMc563/AIbo0H/oXbv/AL/D/CvnP4r8azx/eNcXk1yxxNSmuWL0PbzDJcvxNX2tWknJpXd2vyaPuj4PH/imrH/cFerwkbB9K8l+EJx4Xsz6RivUbe4Gwc16WG+BHwnE0b42dv5mXwRjimtjtUInGKZJcDHWum580oO4y4IwRWNfkYNXrm5GOtYt9cjkZrObPTwtN3MnUCMmsDVT/o0v+4a172cEmsTUpP8ARpf9w1yTPqcJCyR8tfFb/kMf8CNcXXY/FVgdYP8AvGuMyK8yW59tiXaS9EfcXwpfZ4RtT6RCu5ttSGwc9q8/+GkmzwVAfSEVrQaphR81epSlywR8RmuF9ti6v+I7RdSX+9UcmpDHWuWGrHH3qa+qEj71a+0PKWW6m5c6iCDzWTd3ucjNUJdRz3qnLdluAazlM76GC5SW5uMmszUJM2sv+4akkm7Z5qnfP/osoH901i2etSpcp8yfFE51g/7xrjuK674nnOrn/eNcfXA9z6XFu00vJH2v8PWx4Gh/64/0qFLwgdaz/AHiCzXwbFA8yq3lY5PtUYvrcHAmT867VJcqPHnh5PFVW1vI2VvT60fbD6/rWQL6D/nqn/fVKL+DtKn/AH1S5hfVvI1DdZ70wzk98Vni/gx/rk/MUv2yA/8ALZP++qOYaoW6Fwy56VBeEfZZf9w1ELuDoJk/76qHUNRtobGZnnTAQ/xUXKVKV9EfOHxMP/E3P+8a5HNdL8Qr2O51ZjGwIDGuY3iuS1z08dJKrZ9kfS37Q3gm/wDg5qLahpt5DLouozM1tBkiS3J5KdMFRng5zjjHGT403xJv8/xfnX0p+3X/AMizoX/Xd/5Cvj49a3xUVCq1E83Iswr1stpVKju7NX9G0vwR1o+JWodPm/OlHxL1D1f865EUo6VzXZ6v1uodcPiXqA7v+dH/AAszUPV/zrkaKLsaxdQ6/wD4WbqHq/51XvviJf3MBjLOARjrXMU1/u07sUsXVS0Pqb9mn9mfTPFWjnxl4ya31G1voSllZIW+T5hl3PHzfLgAZGCefT2P/hl/4W/9CvD/AN/H/wAaX9mH/kiXh/8A65N/6Ga9Lr2sPQp+zTa6H5ZnWc4+OPqwhVaSk0knbb0P/9k=
        endtext
        strtofile(strconv(m.myvar1,14),'img1.jpg')

        text to m.myvar2 noshow
        /9j/4AAQSkZJRgABAQEBLAEsAAD/2wBDAAYEBAQFBAYFBQYJBgUGCQsIBgYICwwKCgsKCgwQDAwMDAwMEAwODxAPDgwTExQUExMcGxsbHCAgICAgICAgICD/2wBDAQcHBw0MDRgQEBgaFREVGiAgICAgICAgICAgICAgICAgICAgICAgICAgICAgICAgICAgICAgICAgICAgICAgICD/wAARCACLAEYDAREAAhEBAxEB/8QAHAABAAIDAQEBAAAAAAAAAAAAAAUGAQMEAgcI/8QAPxAAAAUCAwMEEAQHAAAAAAAAAAECBBIDBQYRIRRyshZBYXETIjEyNVFSVFVikZKTobHCM0KBwRUjRHOi0fD/xAAbAQEAAgMBAQAAAAAAAAAAAAAABAUBAwYCB//EADcRAAEDAgAKCAUEAwAAAAAAAAABAhEDBAUSMTIzQXGBsfATFBUhUVKRkiNCU6HRIjRhwQaC4f/aAAwDAQACEQMRAD8A/TtxuGykinTR2Z1W0o0S0zy7qlHzJTzmIV5eJRTuSXuyJzqQ30KGP3r3NTKvOsrt3uzFnmV2e1HDg/6JqZ00J/RJkfvqHM3uEEbpnq53lb3J9v7Utba2e/RNRrfF3evOxCE5W2XmtdTLmzrqFP2tR+mvuUseza3nT2mOVtm9FL+OoO1qP019yjs2r509o5W2b0Uv46g7Wo/TX3KOzavnT2jldZvRa/jqDtaj9Nfco7Nq+dPaekYssJqLsltqoT5SKyjV9U/UZbhWhrY5P9l/4YXBtbU9PQsdtuR1qRuLQ7U8pI/EYOFZrLdWrtyPxSzIxf2d+6Mak7HTW12XcuX1lCqr0MVcWq3FXzJ+MnpCk8zeUHjdNeiZxPQyMslJMtDSouYyMdJb3DazMZuTnuUrKtJWOhSsXS6m1bvrqWrirUNqzz/KmmZp4kqWOTv7zFx6utVxW7E7vypcW9tjubT1ImMu/lEPn1Q6lSoqpUUa1rPNSj1MzMca6VWVynUNhEhMh5gPMGZEAgSIBAkQCBIiECTptz1zb3aHTc8lo5uYy50n0GN1vWdSejm5UNNek2o3FdkPorS6NmztLvOLO40eymXdyqoiWfWpKsj6h3NletpvxvkqNnekcUX7HLVLdzm4vzMWN3PErF9UZ2dknx1a5n1zP/Y5y+X4TdruJb2afFdsbwK/AVEFnIgECRAIEiAQJEAgzIgECRAIElhrHnhu256mSqpf5GLd37Zm/iVbf3D9xi7a2tn/AHK/GYXejbtdxFtpHbE4ENAVsE+RAIEiAQJEAgSIBAkQCBIgMQZkmHGlgYF61TiMWT/27N/EgM079x6f621rv1uMx6uNG3a7ieaOkdsTgRsBBgmSYgECREIEiIQJEQgSIBAkQCBJIO/ArIvWqcRiZU0LN5Fp6V242OdWDffq8Zj1VzE2rxPLM9dicDigI0EiRAIEiAQJEAgSIBAkQCBIgECTpfeCmhesv6jdW0Td5qo6R242q1ZUt+rxmNjs1Nq8TWmeuxOBpgNUGyRAIEmIBAkQCDMiAQJEAgSIBAkzcdGDYulX1GbjRtMUM9TfT1ao36nGY2pm714mt2d6cDEBiBIgECRAIEiAQJEAgSIBAkQCBJouujWgXSoarnNQ22+cp0tNW5by+Mxvp5N68TTUzvTgbYD3B4kQCBIgECRAIEiAxAkQCBIgECTgvH4VIukxGusiEm2yqddu1pHvL4zG+hk3rxNFfLz4HXAb4NEiAQJEAgSIBAkQCDMiIQJEQgSRF7/IXT+wgXhOtDts+qKm8rjMSbXXt/sj3XPoSMBMgiSIBAkQCBIgECRAYgSIBAkQCBJA37SqRdP7EKq9ylnZ5DusGvZt4+JQl2WvnWpGvNRLwE+CDIgECRAIEiAQJEAgSIBAkQCBJWMQ6OzL/u9IUt/nlxZZpI4a1U46/uUJmD8rudakS/1E7AWcFdIgECRAIEiAQJEAgSIBAkQCBJUcSaXBZdXCQ5/CGk58C8scwksJ61XfX9yhNwZldzrUiYSyNLJAXEFTJiAQJEAgzIgECRAIEiAQJEAgSUnE/hWqW7wJHNYS0q86kOhwfo051kpgzWu96/uUJ2CM5/OtSFhXI0tMBeQU0iAQJEAgSIBAkQCBIgECRAIElBxVpe65bvAkcphPTru4IdNg7QpzrUksPVEsMTO2FTtZrqU0Z+MlZp9pCdZL0N2+mviqffuIl83pLdr08EUucR0UFBIiECRAIEiAQJEAgSIBAkwaSLU+4ECT5/slbEN/dE1yyyNZGZ5dok0oL2jladu69uHIzbu7kOo6RLWg3G51k9jbDjirVK7sEmddJFtCEd8ce9WnpLnF9/kOCXOXp6WdrT+0KzBN81E6J+TV+DTZMdtV000bnnTqlptBFmlXWRakYrrLDbVSKvcvibLvA7kWafengTxYhsJlnt1H3yFr1+h52+pW9SreVTPKCxefUffIOv0PO31MdSreVfQxygsXn9H3yDr9Dzt9R1Kt5VHKCxef0ffIOv0PO31HUq3lU81MSWCmmSn1Iy9U5H7E5mMOwjbp86HpLCuvyqVa/YuqXEv4faqa4Vu1UrL+Yv1UpLuEYo73Cq1vh0UXv9V2FzZ4MSl+uouT0Qs+EcPKtDJR18jeuMlVstSSRd6jPoz1HWYDwX1Wn+rSOy/x/BT4Svenf3ZqZPyTwuytK9ibD9nrM3D1bVO1JTn2VOaDM8+6cTLP9RRYXwZbvpuqK1MfxycMpaWF7Va9GI79JQdha+R8zHD9XZ4HTdK4bC18j5mHVmeA6Vw2Fr5HzMOrM8B0rhsLXyPmYdWZ4DpXHuhb2iq9NKkaKURHqfj6x7p2tNXIkazy+s6D6Za7JarcnNm2TSUou2XqpXVJWZ5D6JZ4PoUE+G1EX7+q95yFxd1KueskgJxGP//Z
        endtext
        strtofile(strconv(m.myvar2,14),'img2.jpg')

        text to m.myvar3 noshow
        /9j/4AAQSkZJRgABAQEASABIAAD/2wBDABALCwwMDBENDREYEA4QGBwVEREVHCEZGRkZGSEgGRwcHBwZICAlJygnJSAwMDQ0MDBAQEBAQEBAQEBAQEBAQED/2wBDAREQEBITEhYSEhYWEhUSFhwWFxcWHCgcHB0cHCgxJSAgICAlMSwvKCgoLyw2NjExNjZAQD9AQEBAQEBAQEBAQED/wAARCABGAEYDASIAAhEBAxEB/8QAGgABAQADAQEAAAAAAAAAAAAAAAMCBAYFAf/EADIQAAECAQkHAwMFAAAAAAAAAAABAgMEBRETFTRRcrEGEjGBktHwISMyQVKhIkJhccH/xAAZAQACAwEAAAAAAAAAAAAAAAAAAwECBQT/xAAiEQACAQIGAwEAAAAAAAAAAAAAAQIDEQQSMUFRcRMzkSH/2gAMAwEAAhEDEQA/AOwr4cvarGL6etB4UrmpGxFpVepe5CZpU9sCEqLxYmheUSp7n0qopyO+nQs9mmtzXsxmLup3cWYzF3U7uZV7hXuK5h/iXEfhjZjMXdTu4sxmLup3cyr3CvcGYPEuI/DGzGYu6ndzUlUhhs+7qd3N2vca0peruJFyVSjvGPwzmKfUmqO6TyuI5ZG9u9D3l3lY9FT0Sn6LSDmZ/WiA1U47/wDigdHQz68YxqNJHRzTdoORuheL8iE03aDkboXi/ISzRht0jAAFRgAAACMfgWIx+AEnO7QXdudNFA2gu7c6aKDohoZWK9r6Okmm7QcjdC8X5EJpu0HI3QvF+QlmhDbpGAAKjAAAAEY/AsRj8AJOd2gu7c6aKBtBd2500UHRDQysV7X0dJNN2g5G6F4vyNGbI+7JoX8MRF5Gw+UIqiWaMF+LpGYJVyCuQqMKglXIK5AAqRj8D7XISixEVAA8HaC7tzpooE+Uvgta1KV3qfwDohoZWJ9j6PXnrdmicYsn4wonvQqP2teq/pX+lpNG1WYO85gFGlcfTnLIv0WozB3nMWozB3nMAixfPLkWozB3nMWozB3nMALBnlyLUZg7zmYrObF+jvOYAWDPLk97ZCQwJxiRpbKG78KH7MOGv3ejnOX8UAAatDgqNuTP/9k=
        endtext
        strtofile(strconv(m.myvar3,14),'img3.jpg')


        publi yform
        yform=newObject("asup")
        yform.show
        read events
        retu
        *
        DEFINE CLASS asup AS form
            Height = 222
            Width = 252
            AutoCenter = .T.
            Caption = "Sampleform for Virtual Keyboard"
            *-- Reference for the Keyboard
            okeyboard = .NULL.
            Name = "Form1"

            ADD OBJECT label1 AS label WITH ;
                AutoSize = .T., ;
                BackStyle = 0, ;
                Caption = "Enter Value:", ;
                Height = 17, ;
                Left = 24, ;
                Top = 36, ;
                Width = 68, ;
                Style = 3, ;
                Name = "Label1"

            ADD OBJECT text1 AS textbox WITH ;
                FontName = "Courier New", ;
                Alignment = 3, ;
                Value = 0, ;
                Height = 23, ;
                InputMask = "999,999.999", ;
                Left = 100, ;
                SelectOnEntry = .T., ;
                Top = 33, ;
                Width = 128, ;
                Name = "Text1"

            ADD OBJECT label2 AS label WITH ;
                AutoSize = .T., ;
                BackStyle = 0, ;
                Caption = "Enter Value:", ;
                Height = 17, ;
                Left = 25, ;
                Top = 68, ;
                Width = 68, ;
                Style = 3, ;
                Name = "Label2"

            ADD OBJECT text2 AS textbox WITH ;
                FontName = "Courier New", ;
                Alignment = 3, ;
                Value = 0, ;
                Height = 23, ;
                InputMask = "999,999.999", ;
                Left = 101, ;
                SelectOnEntry = .T., ;
                Top = 65, ;
                Width = 128, ;
                Name = "Text2"


            ADD OBJECT label3 AS label WITH ;
                AutoSize = .T., ;
                BackStyle = 0, ;
                Caption = "Enter Value:", ;
                Height = 17, ;
                Left = 25, ;
                Top = 99, ;
                Width = 68, ;
                Style = 3, ;
                Name = "Label3"

            ADD OBJECT text3 AS textbox WITH ;
                FontName = "Courier New", ;
                Alignment = 3, ;
                Value = 0, ;
                Height = 23, ;
                InputMask = "999,999.999", ;
                Left = 101, ;
                SelectOnEntry = .T., ;
                Top = 96, ;
                Width = 128, ;
                Name = "Text3"

            ADD OBJECT label4 AS label WITH ;
                AutoSize = .T., ;
                BackStyle = 0, ;
                Caption = "Enter Value:", ;
                Height = 17, ;
                Left = 26, ;
                Top = 131, ;
                Width = 68, ;
                Style = 3, ;
                Name = "Label4"

            ADD OBJECT text4 AS textbox WITH ;
                FontName = "Courier New", ;
                Alignment = 3, ;
                Value = 0, ;
                Height = 23, ;
                InputMask = "999,999.999", ;
                Left = 102, ;
                SelectOnEntry = .T., ;
                Top = 128, ;
                Width = 128, ;
                Name = "Text4"

            ADD OBJECT label5 AS label WITH ;
                AutoSize = .T., ;
                WordWrap = .T., ;
                Caption = "Here the additional OK Button closes the entry form", ;
                Height = 32, ;
                Left = 12, ;
                Top = 168, ;
                Width = 204, ;
                Name = "Label5"

            PROCEDURE Destroy
                ** Kill the Keyboard
                Thisform.okeyboard = .NULL.
            ENDPROC


            PROCEDURE Init
                 *
                * THISFORM.oKeyboard = NEWOBJECT("tlbNumKeyboard1")     &&uncomment to see another keybord....
                ** choose the one you like best
                THISFORM.oKeyboard = NEWOBJECT("tlbNumKeyboard2")    
                ** see also Form.Destroy for killig it

                WITH THISFORM.oKeyboard
                    .LEFT = THISFORM.LEFT + THISFORM.WIDTH && position to the right of form
                    .TOP = (_SCREEN.HEIGHT - .HEIGHT) /2
                    .VISIBLE = .T.
                ENDWITH
            ENDPROC


            PROCEDURE text1.LostFocus
                This.BackColor = RGB(255,255,255)
            ENDPROC


            PROCEDURE text1.GotFocus
                This.BackColor = RGB(255,128,255)
            ENDPROC

            PROCEDURE text2.GotFocus
                This.BackColor = RGB(255,128,255)
            ENDPROC

            PROCEDURE text2.LostFocus
                This.BackColor = RGB(255,255,255)
            ENDPROC

            PROCEDURE text3.GotFocus
                This.BackColor = RGB(255,128,255)
            ENDPROC

            PROCEDURE text3.LostFocus
                This.BackColor = RGB(255,255,255)
            ENDPROC

            PROCEDURE text4.GotFocus
                This.BackColor = RGB(255,128,255)
            ENDPROC

            PROCEDURE text4.LostFocus
                This.BackColor = RGB(255,255,255)
            ENDPROC

            Procedure destroy
            clea events
            endproc


        ENDDEFINE
        *
        *-- EndDefine: asup
        **************************************************
        *
        DEFINE CLASS cmdkeyboard AS commandbutton
            Height = 70
            Width = 70
            FontBold = .T.
            FontName = "Verdana"
            FontSize = 22
            Picture = "img1.jpg"    &&"images\rot02_70x70.jpg"
            Caption = "1"
            PicturePosition = 12
            Alignment = 2
            Name = "cmdkeyboard"


            PROCEDURE Click
                DO CASE
                CASE This.Caption ="C"
                    KEYBOARD "{BACKSPACE}"
                CASE This.Caption ="Space"
                    KEYBOARD " "
                CASE This.Caption ="<"
                    KEYBOARD "{LEFTARROW}"
                CASE This.Caption =">"
                    KEYBOARD "{RIGHTARROW}"
                CASE This.Caption = CHR(0xFC)   && this is the Ansicode of that WingDings symbols, See \Windows\CharMap.exe for those codes
                    KEYBOARD "{ENTER}"
                    ** Want to close the form?
                    _screen.ActiveForm.release() 

                CASE This.Caption = CHR(0xD9)
                    KEYBOARD "{UPARROW}"
                CASE This.Caption = CHR(0xDA)
                    KEYBOARD "{DNARROW}"    
                CASE This.Caption = "."
                    KEYBOARD SET("POINT")   && for international settings

                OTHERWISE
                    KEYBOARD This.Caption
                ENDCASE
            ENDPROC

        ENDDEFINE
        *
        *-- EndDefine: cmdkeyboard

        *
        DEFINE CLASS cntnumkeyboard1 AS container
            Width = 209
            Height = 278
            BackStyle = 0
            BorderWidth = 0
            Name = "cntnumkeyboard1"

            ADD OBJECT cmdkeyboard1 AS cmdkeyboard WITH ;
                Top = 0, ;
                Left = 0, ;
                Name = "Cmdkeyboard1"

            ADD OBJECT cmdkeyboard2 AS cmdkeyboard WITH ;
                Top = 0, ;
                Left = 69, ;
                Caption = "2", ;
                Name = "Cmdkeyboard2"

            ADD OBJECT cmdkeyboard3 AS cmdkeyboard WITH ;
                Top = 0, ;
                Left = 138, ;
                Caption = "3", ;
                Name = "Cmdkeyboard3"

            ADD OBJECT cmdkeyboard4 AS cmdkeyboard WITH ;
                Top = 69, ;
                Left = 0, ;
                Caption = "4", ;
                Name = "Cmdkeyboard4"

            ADD OBJECT cmdkeyboard5 AS cmdkeyboard WITH ;
                Top = 69, ;
                Left = 69, ;
                Caption = "5", ;
                Name = "Cmdkeyboard5"

            ADD OBJECT cmdkeyboard6 AS cmdkeyboard WITH ;
                Top = 69, ;
                Left = 138, ;
                Caption = "6", ;
                Name = "Cmdkeyboard6"

            ADD OBJECT cmdkeyboard7 AS cmdkeyboard WITH ;
                Top = 138, ;
                Left = 0, ;
                Caption = "7", ;
                Name = "Cmdkeyboard7"

            ADD OBJECT cmdkeyboard8 AS cmdkeyboard WITH ;
                Top = 138, ;
                Left = 69, ;
                Caption = "8", ;
                Name = "Cmdkeyboard8"

            ADD OBJECT cmdkeyboard9 AS cmdkeyboard WITH ;
                Top = 138, ;
                Left = 138, ;
                Caption = "9", ;
                Name = "Cmdkeyboard9"

            ADD OBJECT cmdkeyboard10 AS cmdkeyboard WITH ;
                Top = 207, ;
                Left = 0, ;
                Caption = ".", ;
                Name = "Cmdkeyboard10"

            ADD OBJECT cmdkeyboard11 AS cmdkeyboard WITH ;
                Top = 207, ;
                Left = 69, ;
                Caption = "0", ;
                Name = "Cmdkeyboard11"

            ADD OBJECT cmdkeyboard12 AS cmdkeyboard WITH ;
                Top = 207, ;
                Left = 138, ;
                Caption = "C", ;
                Name = "Cmdkeyboard12"
        ENDDEFINE
        *
        *-- EndDefine: cntnumkeyboard1

        *
        DEFINE CLASS cntnumkeyboard2 AS cntnumkeyboard1
            Width = 284
            Height = 279
            Name = "cntnumkeyboard2"
            Cmdkeyboard1.Name = "Cmdkeyboard1"
            Cmdkeyboard2.Name = "Cmdkeyboard2"
            Cmdkeyboard3.Name = "Cmdkeyboard3"
            Cmdkeyboard4.Name = "Cmdkeyboard4"
            Cmdkeyboard5.Name = "Cmdkeyboard5"
            Cmdkeyboard6.Name = "Cmdkeyboard6"
            Cmdkeyboard7.Name = "Cmdkeyboard7"
            Cmdkeyboard8.Name = "Cmdkeyboard8"
            Cmdkeyboard9.Name = "Cmdkeyboard9"
            Cmdkeyboard10.Name = "Cmdkeyboard10"
            Cmdkeyboard11.Name = "Cmdkeyboard11"
            Cmdkeyboard12.Name = "Cmdkeyboard12"

            ADD OBJECT cmdkeyboard13 AS cmdkeyboard WITH ;
                Top = 1, ;
                Left = 212, ;
                Height = 70, ;
                Width = 70, ;
                FontName = "Wingdings", ;
                Picture ="img2.jpg", ;
                Caption = "Ù", ;
                Name = "Cmdkeyboard13"

            ADD OBJECT cmdkeyboard14 AS cmdkeyboard WITH ;
                Top = 70, ;
                Left = 212, ;
                Height = 70, ;
                Width = 70, ;
                FontName = "Wingdings", ;
                Picture = "img2.jpg", ;
                Caption = "Ú", ;
                Name = "Cmdkeyboard14"

            ADD OBJECT cmdkeyboard15 AS cmdkeyboard WITH ;
                Top = 139, ;
                Left = 212, ;
                Height = 139, ;
                Width = 70, ;
                FontName = "Wingdings", ;
                FontSize = 34, ;
                Picture = "img2.jpg" , ;
                Caption = "ü", ;
                Name = "Cmdkeyboard15"

        ENDDEFINE
        *
        *-- EndDefine: cntnumkeyboard2
        **************************************************
        *
        DEFINE CLASS tlbnumkeyboard1 AS toolbar
            Caption = "Numeric Input"
            Height = 284
            Left = 0
            Top = 0
            Width = 219
            ControlBox = .F.
            Name = "tlbnumkeyboard1"

            ADD OBJECT cntnumkeyboard1 AS cntnumkeyboard1 WITH ;
                Top = 3, ;
                Left = 5, ;
                Name = "Cntnumkeyboard1", ;
                Cmdkeyboard1.Name = "Cmdkeyboard1", ;
                Cmdkeyboard2.Name = "Cmdkeyboard2", ;
                Cmdkeyboard3.Name = "Cmdkeyboard3", ;
                Cmdkeyboard4.Name = "Cmdkeyboard4", ;
                Cmdkeyboard5.Name = "Cmdkeyboard5", ;
                Cmdkeyboard6.Name = "Cmdkeyboard6", ;
                Cmdkeyboard7.Name = "Cmdkeyboard7", ;
                Cmdkeyboard8.Name = "Cmdkeyboard8", ;
                Cmdkeyboard9.Name = "Cmdkeyboard9", ;
                Cmdkeyboard10.Name = "Cmdkeyboard10", ;
                Cmdkeyboard11.Name = "Cmdkeyboard11", ;
                Cmdkeyboard12.Name = "Cmdkeyboard12"

        ENDDEFINE
        *
        *-- EndDefine: tlbnumkeyboard1
        *
        DEFINE CLASS tlbnumkeyboard2 AS toolbar
            Caption = "Numeric Input"
            Height = 285
            Left = 0
            Top = 0
            Width = 294
            ControlBox = .F.
            Name = "tlbnumkeyboard2"

            ADD OBJECT cntnumkeyboard21 AS cntnumkeyboard2 WITH ;
                Top = 3, ;
                Left = 5, ;
                Name = "Cntnumkeyboard21", ;
                Cmdkeyboard1.Name = "Cmdkeyboard1", ;
                Cmdkeyboard2.Name = "Cmdkeyboard2", ;
                Cmdkeyboard3.Name = "Cmdkeyboard3", ;
                Cmdkeyboard4.Name = "Cmdkeyboard4", ;
                Cmdkeyboard5.Name = "Cmdkeyboard5", ;
                Cmdkeyboard6.Name = "Cmdkeyboard6", ;
                Cmdkeyboard7.Name = "Cmdkeyboard7", ;
                Cmdkeyboard8.Name = "Cmdkeyboard8", ;
                Cmdkeyboard9.Name = "Cmdkeyboard9", ;
                Cmdkeyboard10.Name = "Cmdkeyboard10", ;
                Cmdkeyboard11.Name = "Cmdkeyboard11", ;
                Cmdkeyboard12.Name = "Cmdkeyboard12", ;
                Cmdkeyboard13.Name = "Cmdkeyboard13", ;
                Cmdkeyboard14.Name = "Cmdkeyboard14", ;
                Cmdkeyboard15.Name = "Cmdkeyboard15"

        ENDDEFINE
        *
        *-- EndDefine: tlbnumkeyboard2


*endcode

Regards

Griff
Keep [Smile]ing

There are 10 kinds of people in the world, those who understand binary and those who don't.

I'm trying to cut down on the use of shrieks (exclamation marks), I'm told they are !good for you.

There is no place like G28 X0 Y0 Z0
 
The outset is Rajesh already has a keyboard as a toolbar. We just need to position it on a form and get rid of some graphical woes, and the solution is Craig Boyds code using SetWindowRgn.

Woody's Keyboard toolbar looks interesting. It doesn't work as is for me, though.

Rajesh, if you have problems finding out how to get Craig Boyds solution running, I have it going with this resize code
Code:
this.SetDisplayRegion(;
Sysmetric(3)+thisform.container1.left , Sysmetric(9)+Sysmetric(4)+thisform.container1.top-1, ;
Sysmetric(3)+thisform.container1.left + thisform.container1.Width, Sysmetric(9)+Sysmetric(4)+thisform.container1.top-1+ thisform.container1.Height)

Container1 is a container I put on the toolbar and it can contain whatever, in your case, the buttons making up a numpad.

Rest of the code as is from Craig Boyd.

Chriss
 
Dear all,

Mike,
Mike said:
The example you mentioned (to create a toolbar without a border or title bar) was not my code.
Yes, I know that. In fact, I wanted to mention about the link but when I wrote the post I missed it!

Btw Mike & Chriss, I managed to get the code from Craig work. I had to do some corrections and then to experiment with the window region values.

Chriss, yes, I also had to do mostly same thing you explained in your second last post. However, I will just try with your code from your last post as it a bit more dynamically treats the calculations than what I have now. I understand that, in different windows versions or different UI setup of windows will yield different values for borders, title height etc and hence hard coded values may disturb the presentation in another system.

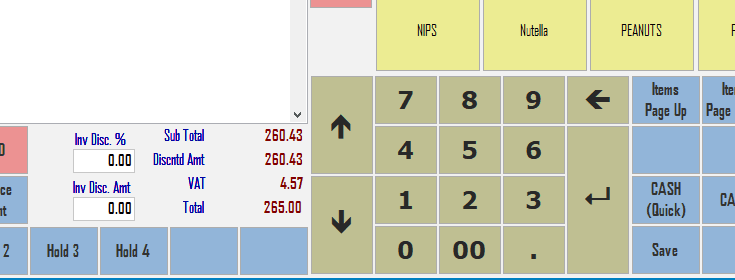
This is what I have now, I need to do some more tweaking though! I added Up Arrow & Down Arrow also to the Numpad class and it saves writing some more own code just for its purpose!

pos-numpad_wwts25.png


Around 75% of my screen elements are drawn dynamically. I did that to make it screen resolution responsive and user data responsive. So here, with Numpad, I am positioning it when the screen is being generated. As Chriss said, I am not worried about aligning everything pixel to pixel!


Rajesh
 
Don't forget, my last code is based on having a container in the toolbar and determines region coordinates from container coordinates and sysmetric metrics. I turned the border of the continer to a red 1 pixel frame and I had to adjust the top parameter with -1 to get the exact rectangle. If all sysmetrics measurements were okay you wouldn't need that -1 correction, it points out Sysmetric(9) or sysmetric(4) is 1 too high, so either you would better use the Windows GetSystemMetric function or there's some other composition of metrics to be used. I don't see how titlebar height + sizable frame height is wrong, the toolbar has a standdard titlebar height and the border has the width of a sizable window border, as a tolbar is a sizeable window.

Chriss
 
Chriss,

Yes, I understand about the adjustments. I did some and it shows okay.

Now, a weird problem I never anticipated! It's obviously because of the native behaviour of a Toolbar.

While a Report Preview window is on screen, my numeric pad is on top of that. Nobody would want that!!!
Any idea to solve this? say, something like, change the zOrder of the preview window etc

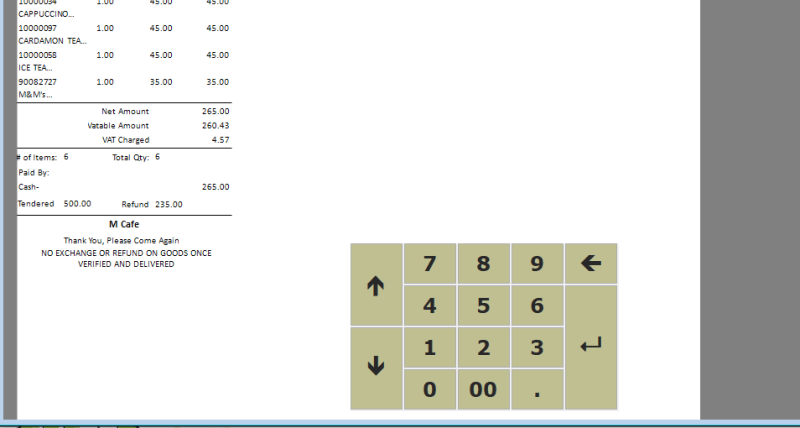
Entry screen with Numpad
pos-numpad_nkjfqs.png


Numpad comes on top of Report Preview window:
pos-numpad_kvo2lx.png


Rajesh
 
Status
Not open for further replies.

Part and Inventory Search

Sponsor

Back
Top