Personally, I think the easiest method to managing announcements in Avaya is through System Manager. I've included some basic steps to audio file manipulation in Audacity but you can use your favorite.
I haven't updated this in a while so some pictures may be slightly out of date.
Converting audio for Communication Manager Announcements
Avaya requires a specific format for audio files. While typically the same for all Media-Gateways, the format can change per location.
Find file format in Communication Manager
In System Manager, go to
Elements / Communication Manager / Element Cut-Through
You may use Avaya Site Administration or another terminal emulator (PuTTY or TuTTY).
To verify the format, run the command display location-parameters [location] for the Media-Gateway and find the Companding Mode on page 1. The same mode is typically used on all Media-Gateway on the same system but not necessarily so.
Choices will either be
Mu-Law or
A-Law.
Click
Done to end the Element Cut-Through.
Using Audacity to Convert Files
There are several open-source programs for converting audio. These directions will use Audacity but should similar to other programs (GoldWave, WavePad, etc.). Installation instructions are not included.
1. Open the audio file.
You can play the file and adjust the volume up or down to determine the best quality for the announcement. You may need to adjust the volume a few times after listening to the announcement on the server via the telephone.
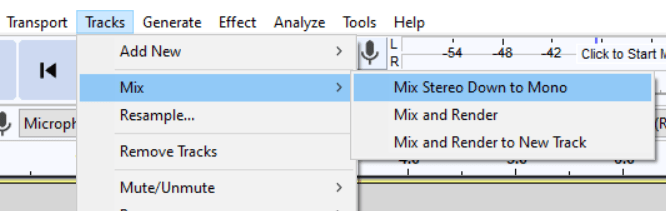
2. If the file has two stereo tracks, convert to a single track via the menu
Tracks / Stereo Tracks to Mono.
3. In the lower-left corner, change the Project Rate (Hz) to
8000.
4. You can change the name of the track by clicking the drop-down menu on the track name. This is handy if you are changing multiple tracks / files.
5.To export a single file, go to
File / Export / Export as WAV and select the correct folder for this project.
The file name will be the track name and must match the announcement name in Communication Manager and
must not contain spaces. You can change the file name at any time via Windows Explorer.
6. Set the Save type as “WAV (Microsoft)” and the Encoding to either U-Law (Mu-Law) or A-Law, depending on what was listed under Location-Parameters in Communication Manager.
7. Click
OK, then click
Save to export the audio.
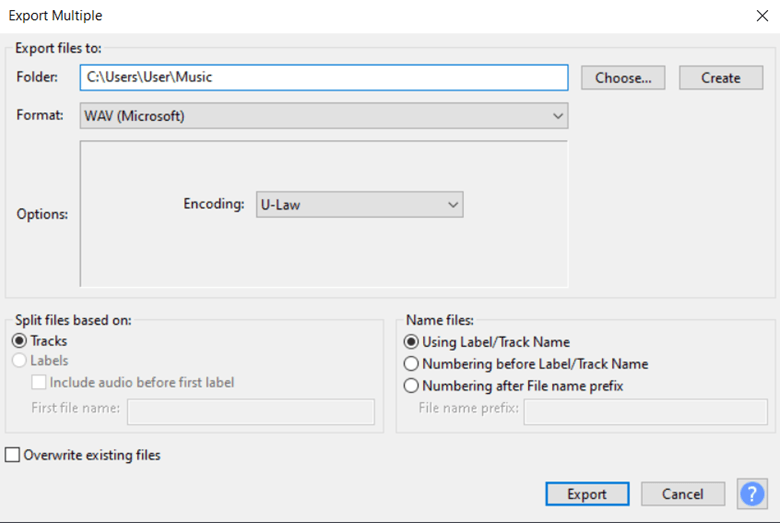
(Alternative) To export multiple tracks, use
File / Export / Export Multiple.
Confirm the Export format and Options, and the location. Select Using
Label/Track Name to use just the track name as the file name and
Split files based on Tracks. Overwrite existing files is optional but recommended to avoid duplicate files if you need to adjust volume and other settings.
Uploading via System Manager
In System Manager, go to
Elements / Communication Manager / Call Center / Announcements. You will see a list of Announcements and files.
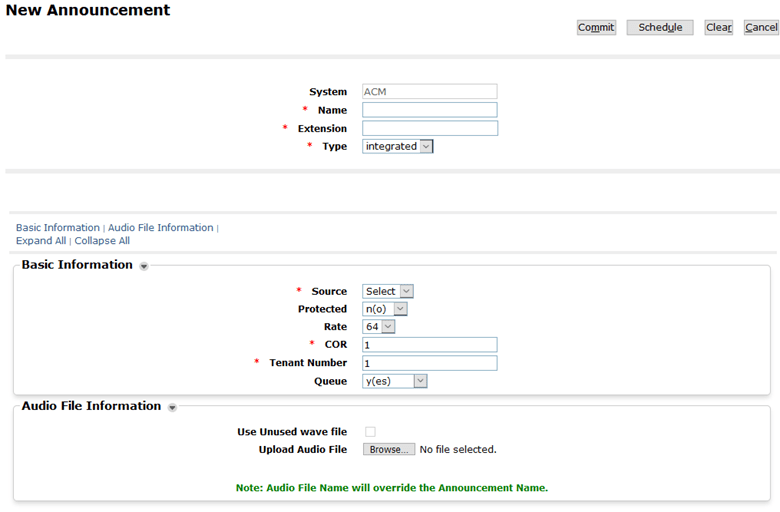
Create a New Announcement
Click on
New. The New Announcement form will show.
Enter the appropriate information:
1. Announcement Name.
Do not use spaces in the name.
You can skip this part if you will upload a file. The file name will overwrite the Announcement name.
2. Extension Number.
3. Type. Select the appropriate type (typically
integrated).
Enter the Basic Information.
1. Source. Select the appropriate Announcement Board or Announcement Group.
2. Protected: Typically no.
3. Rate: 64
4. COR. Unless necessary for your implementation, 1 is sufficient but your system may be different
5. Tenant Number: Enter the appropriate number or leave as 1 if you are not using Tenants.
6. Queue: Typically
Yes. For Music on Hold use
Barge-in.
Enter the Audio File Information.
1. Click on
Browse to select the appropriate file.
You may skip this step if using an Audio Group. You will need to Broadcast the file to all Announcement Boards in the group in a separate step.
Click on Commit to save your changes.
Edit an Announcement
You can change an existing announcements’ properties or upload a new file to a single board by selecting the announcement in the list and clicking
Edit. A page similar to the New Announcement page opens with the same information. To upload a new file, Click on
Browse. Note that the file name will overwrite the Announcement Name. You may rename the file prior to uploading if you want to maintain the same name in the Announcement (recommended).
Click
Commit to save your changes.
Delete an Announcement File
If you upload a new file to an existing announcement and change the name, the old announcement file will still exist, taking up disk memory on the media-gateway.
In the Announcement List, scroll down until you find the OLD File name. In this example, Announcement 80399 was updated from “MOH_04_18_20” to “MOH_02_19_21”.
Confirm you are selecting the correct file, check the box next to it, and click
Delete.
Click
Commit to save your changes.
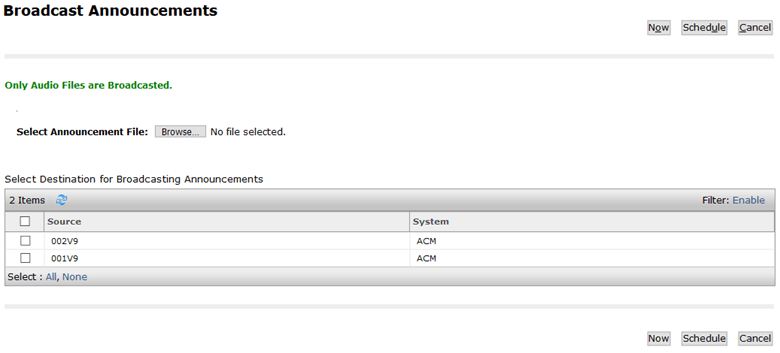
Broadcast Announcements
An Audio Group allows the system to have the Audio File on multiple Announcement Boards for redundancy and extra capacity. To upload an announcement file to multiple Announcement Boards, click on
More Actions and select
Broadcast.
Click on
Browse to select the appropriate Audio File.
Select the Announcement Boards as the destination. Multiple boards may be selected.
Click
Now to initiate the transfer.