Tek-Tips is the largest IT community on the Internet today!

Members share and learn making Tek-Tips Forums the best source of peer-reviewed technical information on the Internet!

  • Congratulations strongm on being selected by the Tek-Tips community for having the most helpful posts in the forums last week. Way to Go!

How to color row grid in alternate shade? 5

Status
Not open for further replies.

Mandy_crw

Programmer
Jul 23, 2020
578
0
16
PH
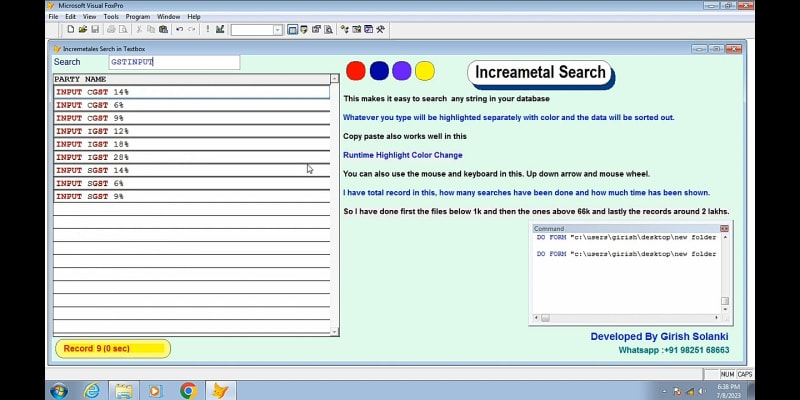
Hi everyone.... I am designing a POS system currently... everything is almost working, but i wanted the row to change shade evertime an item is added...(as shown in the picture)
POS_aatd9w.png
Would everyone teach me please and show me an example code for me to study and probably adapt to my system? Thanks in adavnce and God bless...
 
Dearest Mandy,

Please have a look at DYNAMICBACKCOLOR()

Furthermore, there are quite a few code examples in this forum dealing with this subject, e.g.

Code:
*!*	grid_calculatedcolumn.prg
PUBLIC oform1

oform1=NEWOBJECT("form1")
oform1.Show
Read Events

Close all
Clear All

RETURN


**************************************************
DEFINE CLASS form1 AS form
	AutoCenter = .T.
	Caption = "Grid with calculated columns"
	Width = 570
	Height = 420
	MinHeight = This.Height
	MinWidth = This.Width
	MaxWidth = This.Width
 
	ADD OBJECT grid1 AS grid WITH ;
		ColumnCount = -1, ;
		Left = 10, ;
		Top = 36, ;
		Width = 300, ;
		Height = ThisForm.Height - 42, ;
		RecordSource = "csrSalesData", ;
		Anchor = 15, ;
		ReadOnly =.T.
 
		PROCEDURE grid1.Init
			 WITH This.Column1
				.Header1.Caption = "ID"
			 ENDWITH

			 WITH This.Column2
				.Header1.Caption = "Date"
			 ENDWITH

			 WITH This.Column3
				.Header1.Caption = "Amount"
			 ENDWITH
		 ENDPROC 
		 
	ADD OBJECT grdWeeklySales AS grid WITH ;
		Left = 324, ;
		Top = 36, ;
		Width = 168, ;
		Height = 126, ;
		DeleteMark = .F., ;
		RecordMark = .F., ;
		ScrollBars = 0, ;
		ReadOnly =.T., ;
		Visible = .F.
 
	ADD OBJECT lblDate as Label WITH ;
		Left = 324, Top = 9, Caption = "Enter date :", AutoSize = .T.

	ADD OBJECT txtDate as TextBox WITH ;
		Left = 408, Top = 6, Width = 84, Value = DATE()

	ADD OBJECT lblSalesMonth as Label WITH ;
		Left = 324, Top = 174, Caption = "Sales", Autosize = .T., FontBold = .T., Visible = .F.

 	ADD OBJECT cmdUndo AS CommandButton WITH ;
		Left = 120, Top = 6, Height = 24, Caption = "O-Data"
	
		PROCEDURE cmdUndo.Click()
			With ThisForm.Grid1
				.Visible = .T.
				.ColumnCount = -1
				.Recordsource = "csrSalesData"
				
				.Column1.Header1.Caption = "ID"

				.Column2.Header1.Caption = "Date"

				.Column3.Header1.Caption = "Amount"
			ENDWITH

			WITH ThisForm
				.lblSalesMonth.Caption = ""
				.grdWeeklySales.Visible = .F.
				.Refresh()	
			ENDWITH 
		ENDPROC

	ADD OBJECT cmdDoit AS CommandButton WITH ;
		Left = 10, Top = 6, Height = 24, Caption = "Calculate"
	
		PROCEDURE cmdDoit.Click()
			Local Array laSumMonth[1]
			
			Select dSalesDate, INT((DAY(dSalesDate) - 1)/7) + 1 as iWeek, ySalesAmount ;
				FROM csrSalesData ;
				WHERE YEAR(dSalesDate) = YEAR(ThisForm.txtDate.Value) AND MONTH(dSalesDate) = MONTH(ThisForm.txtDate.Value) ;
				ORDER by 1 INTO CURSOR csrTemp 
			
			LOCATE
		
			IF RECCOUNT("csrTemp") > 0
			
				SELECT iWeek, SUM(ySalesAmount) as yWeeklyTotal FROM csrTemp GROUP BY 1 INTO CURSOR csrWeeklyTotals
				SELECT SUM(ySalesAmount) FROM csrTemp INTO ARRAY laSumMonth

				With ThisForm.Grid1
					.ColumnCount = -1
					.Recordsource = "csrTemp"
[highlight #73D216]					.SetAll("DynamicBackColor", "IIF(MOD(iWeek, 2) = 1, RGB(0,255,255), RGB(0, 255, 0))", "Column")
[/highlight]					.Column1.Header1.Caption = "Date"

					.Column2.Header1.Caption = "Week"
					.Column2.Text1.Inputmask = "9"

					.Column3.Header1.Caption = "Amount"
					.Column3.Text1.Inputmask = "999.9999"
					
				ENDWITH 
				
				WITH ThisForm.grdWeeklySales
					.ColumnCount = -1
					.RecordSource = "csrWeeklyTotals"
[highlight #73D216]					.SetAll("DynamicBackColor", "IIF(MOD(iWeek, 2) = 1, RGB(0,255,255), RGB(0, 255, 0))", "Column")
[/highlight]					.Visible = .T.
									
					.Column1.Header1.Caption = "Week"

					.Column2.Sparse = .F.
					.Column2.Header1.Caption = "Total"
					.Column2.Text1.Inputmask = "999,999.9999"
				 ENDWITH  

				WITH ThisForm
					.lblSalesMonth.Visible = .T.
					.lblSalesMonth.Caption = "Sales in " + CMONTH(ThisForm.txtDate.Value) + " " + ALLTRIM(STR(YEAR(ThisForm.txtDate.Value))) + " : € " + ALLTRIM(TRANSFORM(laSumMonth[1], "999,999,999.9999"))
					.Refresh()
				ENDWITH 
			ELSE
				WITH ThisForm 
					.Grid1.Visible = .F.
					.grdWeeklySales.Visible = .F.
					.lblSalesMonth.Visible = .F.
				ENDWITH 
			
				= MESSAGEBOX("No records found!", 48, "Weekly totals", 3000)

				ThisForm.cmdUndo.Click()
			
			ENDIF
			
		ENDPROC

PROCEDURE Destroy
	Thisform.Release()
	CLOSE ALL
	Clear Events
ENDPROC

PROCEDURE Load
	LOCAL lnI
	
	CREATE CURSOR csrSalesData (Id I AUTOINC, ;
	   dSalesDate D DEFAULT DATE(YEAR(DATE()), 1, 1) + RAND() * 3600, ;
	   ySalesAmount Y DEFAULT Rand() * $500.00)
   
	For lnI = 1 To 7200
	   Append Blank
	EndFor
	
	LOCATE 
	
ENDPROC

ENDDEFINE
*********************************************

hth

MarK


From the top of my head:

[pre]Yourgrid.Setall(DynamicBackColor,"IIf(recno('yourtable')%2=0,rgb(255,128,128),rgb(128,255,128))",'column')
Yourgrid.Setall('sparse',.F.,'column')[/pre]
 
Mandy,

As the others have indicated, the secret is to use the DynamicBackColor property. (Note that this is a property of the column, not of the grid.)

If the underlying table or cursor has no index in force, and if it does not contain any deleted records, and if there is no filter in force, then the code is easy:

Code:
this.SetAll("DynamicBackColor", ;
  "IIF(MOD(RECNO('MyTable'), 2) = 0, ;
    RGB(255, 255, 255), RGB(255, 255, 160))")

Put that code in the grid's Init. That's all you need.

But if the above conditions don't apply (and especially if the cursor is indexed), then it is slightly more complicated. In that case, you won't be able to rely on RECNO() in the above code, so you will need to add a field to the cursor that serves in its place. It should be a numeric field, and you will need to populate it with consecutive integers. Having done that, the code will be similar to the following:

Code:
this.SetAll("DynamicBackColor", ;
  "IIF(MOD(MyTable.CounterField, 2) = 0, ;
    RGB(255, 255, 255), RGB(255, 255, 160))")

where MyTable.CounterField is the field in question.

In both the above examples, the RGB() values determine the actual colours shown. You can experiment with these to find the combination of colours that you like best.

Mike

__________________________________
Mike Lewis (Edinburgh, Scotland)

Visual FoxPro articles, tips and downloads
 
Me said:
if the above conditions don't apply (and especially if the cursor is indexed), then it is slightly more complicated.

In that case, an easier solution might be to create a cursor specifically for populating the grid. Create the cursor like this: [tt]SELECT * FROM MyTable INTO CURSOR csrGrid[/tt] - adding any ORDER BY or WHERE clause that is relevant. Then use the cursor as the RecordSource of the grid. And, finally, put this code in the grid's Init:

Code:
this.SetAll("DynamicBackColor", ;
  "IIF(MOD(RECNO('csrGrid'), 2) = 0, ;
    RGB(255, 255, 255), RGB(255, 255, 160))")

That should work even if the original table has an index set, or has deleted records, or a filter in force.

Mike


__________________________________
Mike Lewis (Edinburgh, Scotland)

Visual FoxPro articles, tips and downloads
 
Mike,
you pointed out a concern I also would point out.

You can only alternately color a grid based on recno(), if records are in record number order, otherwise this will look chaotic and randomly colored. As coloring is based on odd/even record numbers. but in other sort orders like ordered by product type, for example, odd and even record nummbers don't necessarily alternate anymore in that order.

Mandy said:
everytime an item is added.

Mandy,

If I assume you have a cursor of items feeding the grid in the form and starting empty and you add items, they will stay in record number order and all the advice given will work out fine. But things can become out of alternate order, if you delete items. Let's look at an example. Say you have 3 items with record numbers 1-3, then deleting the second item the remaining records don't get renumbered, they keep their record number 1 and 3, both odd and both have the same color. If you delete the last record and the remaining 1 and 2 are still alternating in even/oddness and so also in their color, that's fine at first, but when you add the 4th item it will mean recno 4 follows recno 2 and has the same color. So alternation of colors can easily break.

There are some ways to keep control, for example as Mike suggests: Using your own counterfield.

But I suggest a very simple neat trick that doesn't require working with dynamicbackcolor. Put an image control on top of the grid in grid size with alternating colors that allow the grid rows to show through by using transparency. Say you use a mid to dark blue but with 80%-90% transparency and a 100% transparent stripe the grid then can be kept at its default white color and you generate the light blue by the transparency.

There's a big bonus to this approach, too: It'll color the rows no matter if it starts with no items or not. The only thing that should be prevented is scrolling pixelwise, you should never show the grid scrollbars but add buttons that scroll the items b full rows only. That's the only thing that makes this approach a bit more complicated than using dynamicbackcolor. But it's easy enough, as you have the doscroll method of the grid.

Do you use the gdiplusx library for anything in your application, Mandy? Then this could also be used to generate such a PNG image file on the fly and with the dimensions necessary to fit the grids rowheight and number of rows visible. It's worth doing, as it unbinds you about any headaches about the row numbering. You just have to react to resizing of the grid and the rowheight, though. But that may not be enabled aside from adapting to screen size once at start of the POS system. That only points out that it would be best to create such a PNG with the help of the gdiplusx library whenever you know the dimensions of the grid and its rowheight.

Here's GDIPlusX:

Chriss
 
Here's how to create such a PNG with GDIPlusX:

1. start gdiplusx by doing System.app, usually somewhere early in main.prg, for example:
Code:
Do System.app

2. code to create a png with 12 rows, each 24 pixels height in white (100% transparency) and blue (75% transparency):
Code:
#Define ROW_HEIGHT 24
#Define ROW_WIDTH 800

With _Screen.System.Drawing As xfcDrawing

   loPNG = .Bitmap.New(ROW_WIDTH , 12*ROW_HEIGHT, .Imaging.PixelFormat.Format32bppARGB)
   loGfx = .Graphics.FromImage(loPNG)

   * Create array of rectangles.
   Local Array laRects(6)
   For lnRow = 0 To 5
      laRects(lnRow+1) = .Rectangle.New(0,  lnRow*2*ROW_HEIGHT, ROW_WIDTH , ROW_HEIGHT)
   Endfor

   bgColor = .Color.New(0) && RGBA=0 means alpha=0, which is fully transparent
   bgBrush = .SolidBrush.New(bgColor)
   loGfx.FillRectangles(bgBrush, @laRects)
   bgBrush.Dispose()

   Local Array laRects(6)
   For lnRow = 0 To 5
      laRects(lnRow+1) = .Rectangle.New(0,  (lnRow*2+1)*ROW_HEIGHT, ROW_WIDTH, ROW_HEIGHT)
   Endfor

   bgColor = .Color.FromARGB(64, 0, 0, 255) && 64 means 25% opaque or 75% transparent
   bgBrush = .SolidBrush.New(bgColor)
   loGfx.FillRectangles(bgBrush, @laRects)
   bgBrush.Dispose()

   loPNG.Save('alternateingrows.png')
Endwith

Here's that PNG:
alternateingrows_ln8tbn.png


Chriss
 
Hi to everyone...
Thank you mjcmkrsr, Tore Bleken, Chris Miller... and Mike....
I really appreciate all your answers... and at the same time... i am learning... as i always do when you give answers... Ive gotten what Mike gave... my grid looks good and well pleasing to the eyes... Thanks again everyone.. God bless....
 
Mandy,

fine. Just watch out what it looks like when you delete an item from the list and then add a new one. As said, the coloring based on recno() can easily break and become non-alternating. Mikes recommendation of using an extra field MyTable.CounterField could solve that, if you renumber it every time the number of items change, just loop all items and sequentially number them. It would also work to alternate between the values 1 and 2 or 0 and 1. Or you make that a logical field, say LogicalField, alternating between .T. and .F. like this routine does:
Code:
Local llColorOrNot
Select MyTable
Scan
replace LogicalField with llColorOrNot
llColorOrNot = NOT llColorOrNot
Endscan
This would also work when sorting data by an index, as SCAN goes from first to last record in index order.

And change the dynamicbackcolor expression to
Code:
this.SetAll("DynamicBackColor", ;
  "IIF(MyTable.LogicalField, ;
    RGB(255, 255, 255), RGB(255, 255, 160))")

Chriss
 
Oh i see… thank you so much chriss… ill try ur code… godbless…
 
Hi everyone.... Im so glad that you have helped me... my appilcation is working now with alternate shade of the row... Thanks and God bless....
 
Mike,

Likely not my idea of using an image to color the grid rows. I can understand it's a bit overwhelming if you never used gdiplusx and also I just showed how to create the image file and only sketched how to use it in front of the grid. There are things you need to take into account like the offset of headers and recordmark and deletemark of the grid to position the image.

Here's an example derived from Marks using an Items cursor and the more usual dynamiccolor approach.

Remove the call to Thisform.AlternateColoring() in the PROCEDURE cmdDeleteItem.Click() code and you'll see how the alternate coloring breaks, if you don't refresh the lAlternate field of the items cursor.
Code:
PUBLIC oform1

oform1=NEWOBJECT("form1")
oform1.Show
Read Events
Clear All

RETURN

**************************************************
DEFINE CLASS form1 AS form
	AutoCenter = .T.
	Caption = "Grid with alternate coloring"
	Width = 570
	Height = 420
	MinHeight = This.Height
	MinWidth = This.Width
	MaxWidth = This.Width
 
	ADD OBJECT grid1 AS grid WITH ;
		ColumnCount = 2, ;
		Left = 10, ;
		Top = 36, ;
		Width = 180, ;
		DeleteMark=.F.,;
		Height = ThisForm.Height - 42, ;
		RecordSource = "crsItems", ;
		Anchor = 15, ;
		ReadOnly =.T.

 	ADD OBJECT cmdAddItem AS CommandButton WITH ;
		Left = 20, Top = 6, Height = 24, Caption = "Add Item"
	
		PROCEDURE cmdAddItem.Click()
		     Append Blank in crsItems
		     nRecno = Recno()
		     Thisform.AlternateColoring()
		     Locate
		     thisform.grid1.setfocus()
		     Go nRecno
		ENDPROC

 	ADD OBJECT cmdDeleteItem AS CommandButton WITH ;
		Left = 120, Top = 6, Height = 24, Caption = "Delete Item"
	
		PROCEDURE cmdDeleteItem.Click()
		     Delete in crsItems
		     nRecno = Recno()
		     Thisform.AlternateColoring()
		     Locate
		     thisform.grid1.setfocus()
		     Go nRecno
		ENDPROC
 
		PROCEDURE grid1.Init
			 WITH This.Column1
				.Header1.Caption = "ID"
			 ENDWITH

			 WITH This.Column2
				.Header1.Caption = "ItemName"
			 EndWith
			 
			this.SetAll("DynamicBackColor", "IIF(lAlternate,RGB(255, 255, 255), RGB(255, 255, 160))") 
		 ENDPROC 
		 
PROCEDURE Destroy
	Thisform.Release()
	Clear Events
ENDPROC

PROCEDURE Load
    Set Deleted on
	CREATE CURSOR crsItems (Id I AUTOINC, cItemName c(20) default "item "+Transform(id), lAlternate L)
EndProc

Procedure AlternateColoring()
    thisform.LockScreen=.t.
    Select crsItems 
    Local llColorOrNot
    Scan
       Replace lAlternate with llColorOrNot
       llColorOrNot = NOT llColorOrNot
    EndScan
    thisform.LockScreen=.f.
Endproc

ENDDEFINE
*********************************************

Also notice, how the grid is all white without any items and is always white in rows with no data, which is because coloring is only applied to rows with data, there is no dynamicbackcolor commputed for rows without data, not only because the IIF expression depends on a field, empty rows are always drawn with default backcolor and only gridlines.

The advantage of dynamicbackcolor is, that this coloring obviously scrolls with the data, whereas an image in front of the grid stays in position and that's getting obvious when you scroll - only the data scrolls, not the coloring.

It's a matter of taste what you want to have, using empty records to populate all grid rows with colors can be a solution to that, but has its con, too, as scrolling up still makes the lower portion of the grid white.

Chriss
 
Hi Mike… I've what you have suggested… thanks Mike for always helping…

Chriss… this is another approach… i will atudy it… thanks to you… as always…
 
Mandy,

this is just a full example of the idea I suggested to use a logical field and a routine to refresh that whenever a record is added or removed, as otherwise, you risk breaking the alternate coloring.

There are some corner cases where deleting doesn't break the alternate coloring, if you delete the last or first item. And there's the even simpler corner case you always only add records and never delete them. Then just the new record needs the new logical opposite than the last or the next number in a numbering sequence as Mike suggested. But in the general case you simply at best repopulate the field that's responsible for the alternating colors, that's the easiest way to never let it break the look.

I asked you to test the case of deleting an item. Did you test that? Because unless it's just the last item you delete one row of a color between two rows of the same color and that means after the row is removed two rows with the same color remain. I thank you for always being thankful for all we post, but you rarely really react and give feedback to questions and recommendations, that's missing and I fear you only end up with something that somwhat works, but hasn't all the details necessary.

And in a POS system, if the item list is populated by scanning barcodes, the deletion of an item is a rarely used scenario, but you'll regret, if that happens and the alternating color look breaks. So in general, think about corner cases in your design and test whether they break even just the design you have in mind, not only by showing up errors. Otherwise you can live with that, it just will have quirks. In the long run, such things lead to the rejection of a system, if people find better designed systems. And POS and VFP is not a rare combination, others already did POS systems with VFP, too, so you have a big competition and a lot of contenders to replace your system, not only just the VFP based systems.

Chriss
 
Hi Chriss... Thank you giving ample explanations of these... yes Chriss I tested deleting an item from the grid... and for some reason it did not show desame row color... it maintained an alternate shading in the grid... ill show excerpt from my code in the part that used the ssugested code of Mike...

SELECT * from BINILI WHERE qty => 1 INTO CURSOR junk

SELECT BINILI
ZAP
APPEND FROM DBF("junk")
USE IN SELECT("junk")

thisform.Grid1.SetAll("DynamicBackColor", ;
"IIF(MOD(RECNO('Binili'), 2) = 0, ;
RGB(255, 255, 255), RGB(255, 255, 160))")

Thisform.grid1.refresh

this.Value = ""
thisform.text2.Value = 1
UNLOCK IN binili
RETURN 0

Thanks Chriss... God bless...
 
Mandy,

The code you posted more or less matches what I had in mind. I'm pleased to see it was helpful.

Just one very minor point. Your code includes [tt]UNLOCK IN binili[/tt]. Strictly speaking, that's unnecessary, because BINILI is, by necessity, opened exclusively. If it wasn't, you wouldn't be able to do the ZAP. This makes no difference to how your code works, but I thought I would point it out as it suggests a possible misunderstanding on your part.

Mike

__________________________________
Mike Lewis (Edinburgh, Scotland)

Visual FoxPro articles, tips and downloads
 
I see, you're complicating how to maintain your list of items, though.

Code:
SELECT * from BINILI WHERE qty => 1 INTO CURSOR junk

SELECT BINILI
ZAP
APPEND FROM DBF("junk")
USE IN SELECT("junk")

This part of your code ensures that you remove items from BINILI, if their qty was lowered to 0. The normal way to delete one record is just using the DELETE command.

I don't mind, it actually helps the coloring by recno to be stable and not break, so you "accidentally" have a solution that is stable for coloring. But lets think about extreme cases, if you work on data in a large table this way and remove items with qty<=0 by a Select of all items with qty=>1 and then a zap and append, you do a lot of moving data around, that could simply stay were it is.

Is it that you don't know how to suppress the display of deleted records? You simply SET DELETED ON. And then a delete makes a record invisible.


Chriss
 
Status
Not open for further replies.

Part and Inventory Search

Sponsor

Back
Top