Tek-Tips is the largest IT community on the Internet today!

Members share and learn making Tek-Tips Forums the best source of peer-reviewed technical information on the Internet!

  • Congratulations gkittelson on being selected by the Tek-Tips community for having the most helpful posts in the forums last week. Way to Go!

Creating a 10 x 10 Grid

Status
Not open for further replies.

David Higgs

Programmer
May 6, 2012
392
GB
Hi,

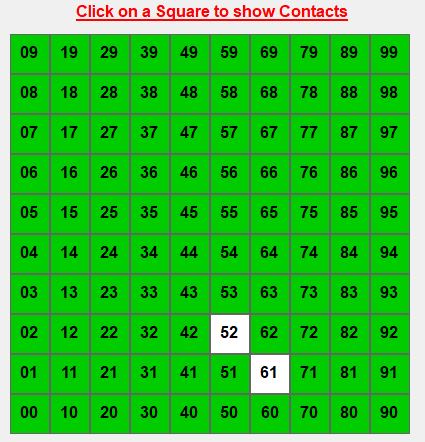
I have the following 10 x 10 Grid on a Form that I drew with Lines & Shapes and each Square has code that executes when "Clicked". I remember it being a long tedious job!

I would like to be able to code it using OOP but lack the knowledge. How would I make a start?

VFP_Grid_rew6to.jpg


Regards,

David.

Recreational Developer / End User of VFP.
 
Using OOP is definitely the way to go. But it would take a lot more than a few forum posts to teach you what you need to know.

Just to give you a start, you would want each of the cells of the grid to be based on a custom class. One approach would be to base that class on a label. You would set its various font, colour and border properties to make it look the way you want. The Click event would change the colours in some way to show that it has been selected, and also to do whatever you want to do for "show contacts".

Alternatively, you could base the cell on a command button. Again, change its cosmetic properties to reflect the way you want it to look.

Either way, you would then instantiate 100 instances of the class. You would probably do that in a nested loop. The inner loop would create the ten cells in a row. The outer loop would create the ten rows. As you create each cell, set its Top and Left properties to determine its position, then set its Visible to.T. to make it appear.

Yo might also want a Collection class to keep track of the cells as you create them.

As you can see, there is quite a lot to learn here. You would normally expect to spend a lot more time - possibly several hours - designing and planning this type of object model. You will also need to read up on the relevant syntax, include DEFINE CLASS, the NNEWOBJECT() function, the AddObject method, etc.

Still, I hope the above will get you started. Come back when you have detailed questions.

Mike

Mike


__________________________________
Mike Lewis (Edinburgh, Scotland)

Visual FoxPro articles, tips and downloads
 
David,

I suddently remembered that I have done something similar. I once tried to write a program that generated a killer sudoku puzzle. This is also based on a grid of cells, but in this case it is a 9 x 9 grid.

I've copied and pasted some of the code from my program, to give you a rough idea of what's involved. I've stripped out anything specific to the killer puzzle. Even so, this is not meant to be anything that you can run yourself. It is just to give you the general idea.

The terms shown in caps, such as GRIDWIDTH and GRIDHEIGHT are defined in #DEFINEs, and are mostly measurements expressed in pixels.

First, here is the code to crerate the main form, which is based on my GridForm clas:

Code:
goForm = CREATEOBJECT("GridForm")
ShowMainForm()

The ShowMainForm() function has the code for actually setting up the grid:

Code:
FUNCTION ShowMainForm
* Everything that needs to be done to populate the main
* form and to display it. Called at the start of the run.
* the main form object, goForm, already exists at this point.

LOCAL lnI
LOCAL lnCellLeft, lnCellTop, lnGridRow, lnGridCol, lcCellName
LOCAL loCell

* Add main grid to form
goForm.AddObject("oGrid", "GridContainer")
WITH goForm.oGrid
    .Height = GRIDHEIGHT
    .Width = GRIDWIDTH
    .Visible = .T.
ENDWITH

* Add cells to grid
lnCellLeft = 1
lnCellTop = 1
lnGridRow = 1
lnGridCol = 1
FOR lnI = 1 TO 81
    lcCellName = "cell" + TRANSFORM(lnI)
    goForm.oGrid.AddObject(lcCellName, "Cell")
    loCell = EVALUATE("goForm.oGrid." + lcCellName)
    WITH loCell
        .top = lnCellTop
        .left = lnCellLeft
        .nIndex = lnI
    ENDWITH

    IF lnGridCol = 9
        * Start next row
        lnGridRow = lnGridRow + 1
        lnGridCol = 1

        lnCellTop = lnCellTop + CELLHEIGHT + ;
            IIF(INLIST(lnGridRow, 1, 4, 7, 10), CELLBOUNDTHICK, CELLBOUND)
        lnCellLeft = 1
    ELSE
        lnGridCol = lnGridCol + 1

        lnCellLeft = lnCellLeft + CELLWIDTH + ;
            IIF(INLIST(lnGridCol, 1, 4, 7, 10), CELLBOUNDTHICK, CELLBOUND)

    ENDIF

ENDFOR

* Make the grid visible
goForm.oGrid.SetAll("Visible", .T.)

goForm.Show

ENDFUNC

And here are the class definitions. I put these in the same PRG as the above code, at the end of the file:

Code:
DEFINE CLASS GridForm AS Form
    * This is the form that holds the grid
    Height = GRIDHEIGHT
    Width =  GRIDWIDTH
    BorderStyle = 1
    Caption = gcTitle
    Name = "GridForm"
    KeyPreview = .T.

ENDDEFINE

DEFINE CLASS GridContainer AS Container
    * This is actual grid, that is, the container for the cells
    BorderWidth = 0
    BackColor = -1
ENDDEFINE

DEFINE CLASS Cell AS Container
    * This is an individual cell
    Height = CELLHEIGHT
    Width = CELLWIDTH
    BackColor = -1	&& white
    BorderWidth = 0
    nIndex = 0		&& index no. within grid (1 - 81)
    nRow = 0		&& row number of cell (1 - 9)
    nCol = 0		&& column number of cell (1 - 9)
    cValue = ""		&& value of the cell
    lSelected = .F. && says if cell currently selected (highlighted) by user

    PROCEDURE Click
    * Do whatever you want to do when user clicks on a cell
    ENDPROC

    PROCEDURE DblClick
    * Do whatever you want to do when user double-clicks on a cell
    ENDPROC

    ADD OBJECT oCellValue AS CellValue
    && this is the label that displays the value
ENDDEFINE

DEFINE CLASS CellValue AS Label
    * This is the label tha appears in the cell; it displays
    * the relevant number
    FontSize = CELLVALUESIZE
    Top = CELLVALUEMARGIN
    Left = CELLVALUEMARGIN
    BackStyle = 0
    AutoSize = .T.
    Caption = ""

    PROCEDURE Click
    * pass click up to parent cell
    this.Parent.Click
    ENDPROC

    PROCEDURE DblClick
    * pass the double click up to the parent cell
    this.Parent.DblClick
    ENDPROC

ENDDEFINE

As you will see, I based my cell class on a container rather than a label, as suggested in my previous post. But the general idea will be the same.

I hope this all makes sense. I copied the code in a bit of a hurry, so can't guarantee that it is perfect.

Mike


__________________________________
Mike Lewis (Edinburgh, Scotland)

Visual FoxPro articles, tips and downloads
 
Hello Mike,

Thank you for your replies and code, much appreciated.

I appreciate that what I am proposing is not going to be an easy task but I'm prepared to have a go.

The original Grid took many hours / Days to get it to do what I wanted it to do but it doesn't allow easy modifications hence my reason for wanting to try OOP.

You mention the use of CLASSES which I haven't made use of in the past, so I need to read up a bit more on that.

Your Code, although not meant to be a working solution, will no doubt steer me in the right direction.

By the way, I've started to re-write my original Amateur Radio Logbook Program and have made many improvements along the way. In particular, I set out to eliminate as many, if not all, PUBLIC Variables and have been very successful so far using Passing Parameters, FORM Properties and Methods.

I'm sure I'll be back for more once I've digested the information you've provided.


Regards,

David.

Recreational Developer / End User of VFP.
 
David, I wish I could recommend a good book or series of articles on helping you to get started with classes and objects. No doubt other forum members will have some good ideas.

Come to think of it, a good place to start might be HackFox ( - in particular the chapter entitled "OOP is Not an Accident!".

Good luck with this. If this does nothing but encourage you to get to grips with object orientation, it will be time well spent.

Actually, I'm quite pleased that you started this thread because it gave me an excuse to blow the dust of my killer sudoku generator. I realise now how unnecessarily complicated I made it. Maybe I'll re-do one day. It should be fun.

Mike

__________________________________
Mike Lewis (Edinburgh, Scotland)

Visual FoxPro articles, tips and downloads
 
It surely isn't a way to learn OOP as a whole, but such a "grid" of controls is a good example where a button class will help to only need to write something once and reuse it. So learn one major concept of OOP: reusability. You might need to generalize code where you had individual changes.

I would start by asking what did took so long, did you go into every click event and pasted in the same code? Then that's what a class would do for you.

But not every tedious task is solved by OOP, if you want to have an SCX with the buttons you still need to put 100 buttons on it. You can write a loop that does that at form.init instead, but then the form designer would have an empty area there.

It's not that unusual, because the next thing you could use is like that anyway: The grid control. In the form designer you have an empty grid, you define it mainly on the column level and the data populates the rows - at runtime, not while you design the form. But this is not very OOP specific, that's VFP control specific, though HTML controls and widgets or how they are named elsewhere all mainly just show their runtime look, well, at runtime.


Chriss
 
I've also done something along these lines as part of work with Sudoku. In my case, it was for a session I gave about business objects and separating business logic from the user interface. I wrote about it here: and you'll find a link to the actual code here:
Tamar
 
Hello Chris,

Thank you for your input.

Chris Millar said:
I would start by asking what did took so long, did you go into every click event and pasted in the same code? Then that's what a class would do for you.

Yes, I did just that. So I am looking at reproducing the Grid without the burden of having to edit each individual Square.

It surely isn't a way to learn OOP as a whole, but such a "grid" of controls is a good example where a button class will help to only need to write something once and reuse it. So learn one major concept of OOP: reusability.

Mike Lewis has suggested I take a look at using CLASS so I will take a look at that. I will also give some thought on the use of a BUTTON Class.


Regards,

David.

Recreational Developer / End User of VFP.
 
Tamar,

Thank you for the links to your Conference Sessions.

I'll transfer the PDF File to my Tablet and have a good read. A quick glance at the PDF file shows that it will make interesting reading.

Thank you for sharing, much appreciated.


Regards,

David.

Recreational Developer / End User of VFP.

P.S I've just looked at your list of PDF's, there's plenty there of interest, SQL jumped out at me!
 
Mike Lewis said:
Come back when you have detailed questions.

One question before I head down the wrong path.

As I have already made a start on a revamped version of my original where I have a MAIN FORM with a MAIN PAGEFRAME. Will I be able to incorporate any future OOP Code onto my FORM and PAGEFRAME ?

I have some OOP Code that I could modify to suit my requirements that will produce a FORM with a PAGEFRAME if that's an easier / only option available.

Whichever why I go is going to be a steep learning curve, just need to make that curve as gentle as possible!

Regards,

David.

Recreational Developer / End User of VFP.
 
As I have already made a start on a revamped version of my original where I have a MAIN FORM with a MAIN PAGEFRAME. Will I be able to incorporate any future OOP Code onto my FORM and PAGEFRAME ?

Probably. Forms and pagefames are both containers. The general principles of OOP apply to both.

Mike Lewis has suggested I take a look at using CLASS so I will take a look at that.

From that question, it looks as if you are thinking of classes as something different from OOP. In fact, a class is one of the basic building blocks of OOP. You create a class (either with DEFINE CLASS, as I did in the example I posted, or in the visual class designer). You then instantiate the class to create one or more objects. That;s a highly simplified explanation, but it should help.

Mike

__________________________________
Mike Lewis (Edinburgh, Scotland)

Visual FoxPro articles, tips and downloads
 
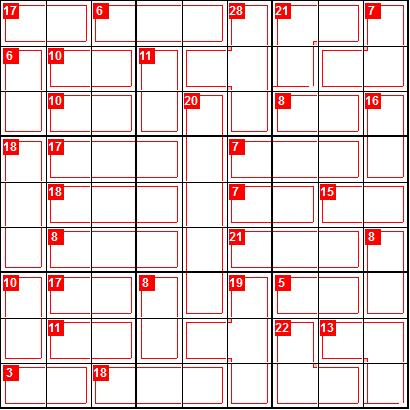
At risk of going way off subject, here is an example of a killer sudoku that my program generated. As you can see, as well as the basic 9 x 9 grid, it also has "cage" objects (these are the groups of cells delineated by red lines) and "value" objects (the total value of each cage, shown as white on red numbers).

If anyone wants to have a shot at solving it, I will in due course post the solution.

DECEMBER_2020_splbki.jpg


Mike


__________________________________
Mike Lewis (Edinburgh, Scotland)

Visual FoxPro articles, tips and downloads
 
Mike Lewis said:
From that question, it looks as if you are thinking of classes as something different from OOP. In fact, a class is one of the basic building blocks of OOP.

This is all very new to me; so, I'll be starting at the bottom of the ladder. I will try and digest the information I have been given and hopefully, I'll achieve what I set out to do.

Regards,

David.

Recreational Developer / End User of VFP.
 
Hello,

after learning about oop as suggested you may start "the visual way" like this :

lets take a table /cursor srcdata with 10 columns colu1-colu10

Start a new project, in the project goto classes - new :
classname frm_myform (or whatever), based on form. Change to your needs (color, width,...)
You may also add propertys ("variables") and methods ("functions")
propertys can be accessed with thisform.propertyname = value, or read with m.value = thisform.propertyname
Methods contain code and can be called for example from a button, a timer, other methods, events (click), ....

saveit into a new library (vcx) myclasses.vcx
(you "subclass" the vfp formclass)

do similar with txtbox or button (text_whatever from textbox, btn_whatever from commandbutton).
Add propertys / methods to your needs, for example a method _setcaption() and a property _position (later use)
Change coolor, font , border, ...
saveit into a new library (vcx) myclasses.vcx

Create a new form and drag your new textbox/button from myclasses on it, no need to save it, its just for easy cut&paste
Now mark txtbox/button in temp form, press strg+C.

Then do like for new form/txtbox similar with grid (grd_whatever based on grid), set deletemark, .. set column count to 10
In grid for each of the 10 columns :
set sparse to .f., set controlsource (colu1-10)
mark the column
mark element "text1" in the columns in vfp propertysheet, click on grid, press del. This will remove text1 (so columns has no control).
click on grid and press strg+v. This will copy your button into the grid column.
Set _position of each txtbox/button according to columnn number (1-10) if you like (for later use ??)
saveit into a new library (vcx) myclasses.vcx

setup and use extras - toolbox which allows a very efficent way to attach your myclasses.
From toolbox choose your formclass frm_myfrom , create new (you built a new instance)
Drop a grid from myclasses on it.
(you may also have put grid into fromclass, then this is not needded but less flexible, because all new form from this class will have the grid)
save this form as main

I have done a sample with 4 columns, column 1-3 contain mytextbox, col4 the standard one
(pls set default to extract folder before starting mainform)


Now close main form, goto you myclasses- txtbox and change color or font, save it and close designer.
Reopen main form, without changing a line of code in grid of mainform it is changed

Remark
I started with btn_mybtn and some code to set caption , not finished, had to leave
You may have a look on it in _setcaption which can be called from _setit (see comments)

Best regards
tom

I know, there are much better ways like subclassing a column, this is just meant for a "visual start" and show some tools like toolbox
And there is bindevent :)
 
 https://files.engineering.com/getfile.aspx?folder=66a9ae80-bce3-42a1-a313-5f61ac1a2d27&file=10grid.zip
TomK3 said:
after learning about oop as suggested you may start "the visual way"

Hello Tom,

Thank you for your input and sample code. Once I have done a bit of research, I'll find your code useful to play around with, at the moment I have a lot to take in!

No doubt, questions will follow!

Regards,

David.

Recreational Developer / End User of VFP.
 
Status
Not open for further replies.

Part and Inventory Search

Sponsor

Back
Top